發表文章

目前顯示的是有「android memo」標籤的文章

Google Analytics

圖片
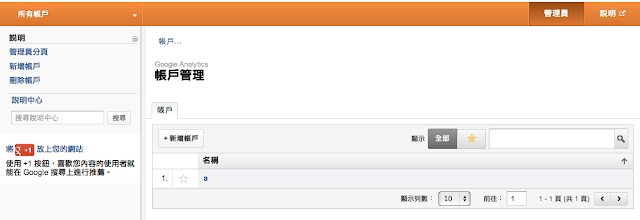
google Analytics 推出了手機的服務了。不用再用以往使用一個 dummy 的網址了。有了它,就可以了解人們如何使用我們所開發的APP了,進一步來改善APP的品質。 快來看看使用的方法 第一步: 先下找新版的jar檔-> GoogleAnalyticsAndroid.zip 解壓後將 libGoogleAnalyticsV2.jar 放在 project 的 \libs 中 第二步: 進入http://www.google.com/analytics/ 登入,如沒有帳號請申請一個 點擊"管理員"如下 在帳戶中點擊"新增帳戶",如下,點擊應用程式。將下方的表格埴一填。即出現新的帳戶。這裡指的帳戶就是不同的網站或是應用程式。最下方有"取得追蹤編號",點擊後就會出現編號了。這個就是程式中要用的編號。 第三步: 程式的寫法,在activity中新增        Context mc=this;         // 先得到一個Instance         GoogleAnalytics trackerInstance=GoogleAnalytics.getInstance(mc.getApplicationContext());         // 從instance中得到Tracker,記得放前追蹤編號。         Tracker tracker = trackerInstance.getTracker(" UA-xxxxxxx-x ");         // Dispatch內定是30分鐘,如果使用者在30分鐘內將應用程式關閉,記錄會留下,待下一次程式被執行,會發送出記錄。如果想要縮短發送的時間可以如下         GAServiceManager.getInstance().setDispatchPeriod( 60 );// 設定為60秒 到此基本的Tracker已得到,接下來是針對某一個新的頁面被打開時,了解頁面被打開的次數跟時間 用tracker.trackView("lable") 其中的lable為自定意的一個標籤。         Button aBu

Access Internal Storage 存取android手機內存

Android 手機的內存是放在 /data/data/<package name>/files,可以使用getFilesDir()得到路徑。如下: File fileDir = getFilesDir(); 每一個app有各自的user id和自己權限跟空間。所以存在手機內存的資料就會權限的問題。要開啟或創建時就需要權限的設定。以android developer內的說法,存取內存要使用openFileOutput這個程式,反回為FileOutputStream。如下: FileOutputStream imageFout = openFileOutput("FileName",MODE_WORLD_READABLE); FileName只要檔名即可,不用完整路徑。 Context.MODE_PRIVATE:代表該檔是私有資料,只能被APP本身訪問。如果檔案已存在,會覆蓋原檔。 Context.MODE_APPEND:會檢查檔案是否存在,存在則將內容增加到檔案內;如檔案不存在就創建新檔。 Context.MODE_WORLD_READABLE:其它應用程式也可以讀。如果要在APP中使用 intent.ACTION_SEND,要使用此模式。 Context.MODE_WORLD_WRITEABLE:其它應用程式也可以寫入此檔。 如想要兩個模式共有,如下 openFileOutput("FileName", MODE_WORLD_READABLE + MODE_WORLD_WRITEABLE); Developer 中的範例如下(建立文字檔) String FILENAME = "hello_file" ; String string = "hello world!" ; try{ FileOutputStream fos = openFileOutput ( FILENAME , Context . MODE_PRIVATE ); fos . write ( string . getBytes ()); fos . close (); }catch(IOExc

GLSurfaceView android 3D 繪圖

圖片
要了解如何在android中實作繪圖,要先知道兩個物件 一個是 GLSurfaceView 一個是 GLSurfaceView.Renderer GLSurfaceView 實作繪圖的視窗,是繼承自SurfaceView的View。因為是繼承自SurfaceView所以一樣有底下這些常用的方法 setRenderer() onPause() onResume() queueEvent() surfaceChanged() surfaceCreated() surfaceDestroyed() ... 其它不多做贅述 GLSurfaceView.Renderer  繪圖物件的處理,所有繪圖的部分都在這裡處理,其下有三個方法      onDrawFrame(GL10 gl) //畫圖函數放在這裡。      onSurfaceChanged(GL10 gl, int width, int height)      onSurfaceCreated(GL10 gl, EGLConfig config) //Render被創立之後,初始化的函數都放在這裡。函數會被執行一次。 主要的Activity,要先把一個GLSurfaceView建入contentView。在這裡就是Oglv。 public class OpenglTest extends Activity {      private Oglv oglv;      public void onCreate (Bundle savedInstanceState){           super.onCreate(savedInstanceState);           oglv = new Oglv(this);           setContentView(oglv);      } } 建一個新的class,名為Oglv,繼承自GLFurfaceView class Oglv extends GLSurfaceView {      private OglvRender oglvRender;      public Oglv(Context mc){           super(mc);           ogl

Resources String from Name, 由字串名得到字串

想要在程式中使用resource 中的字串,可以用以下的方法 String str = getResources().getString(int id); 但是如果我們希望用resources 中的字串名來使用字串,就要先把字串名轉成id int resId=getResources().getIdentifier(name, "string", getPackageName())) name 是指在 R.string.XXXX 的 XXXX, "string"是指 R.string.XXXX 的string, 所以如果是 R.drawable.XXXX,"string", 就要改成"drawable"。 最後是package name, 使用getPackageName(),來得到package name, 或直接打上package name都可以。 有了resId, 現在只要 String str=getResources().getString(resId); 如此即可得到字串。 有人說用 getResources().getIdentifier(name, "string", getPackageName())) 太沒有效率,速度慢。所以可以用另一種方法如下  try {             Class res=R.string.class;  // 如果是drawable就變成Class res=R.drawable.class             Field field = res.getField(" name ");// name要改成字串名             int resId = field.getInt(null);             String str=getResources().getString(resId);         }         catch (Exception e) {                   } 速度的確快很多…

android:iputType 類型

android:inputType="none" android:inputType="text" (文字) android:inputType="textCapCharacters" android:inputType="textCapWords" android:inputType="textCapSentences" android:inputType="textAutoCorrect" android:inputType="textAutoComplete" android:inputType="textMultiLine" android:inputType="textImeMultiLine" android:inputType="textNoSuggestions" android:inputType="textUri" android:inputType="textEmailAddress" android:inputType="textEmailSubject" android:inputType="textShortMessage" android:inputType="textLongMessage" android:inputType="textPersonName" android:inputType="textPostalAddress" android:inputType="textPassword"(EditText出現星號) android:inputType="textVisiblePassword" android:inputType="textWebEditText" android:inputType="textFilter" android:inputType=&quo

Bitmapfactory Out of Memory

很多時候,在我們使用BitmapFactory 會產生out of memory的錯誤。因為記憶體對android系統是很寶貴的。所以每一個程式都會限制在一定大小的記憶體裡,只要超過了,系統就會顯示out of memory。通常都會發生在載入圖片的時候。 如果一張2592*1936像素大小的圖片,每一個像素又使用ARGB_8888,那麼他的大小就是19M左右(2592*1936*4 bytes)。這跟圖片格式無關,當程式載入圖片到記憶體中時,就是要恢復成Bitmap去對應螢幕上的每一個像素。所以,如果我們要載入照片,因為現在的照片格式都很大,我們不可能一一去了解照片的格式和大小。就需要用到BitmapFactory.Options的功能。 BitmapFactory . Options options = new BitmapFactory . Options (); options . inJustDecodeBounds = true ; BitmapFactory . decodeResource ( getResources (), R . id . myimage , options ); int imageHeight = options . outHeight ; int imageWidth = options . outWidth ; String imageType = options . outMimeType ;   這一段程式的內容是利用options.inJustDecodebounds設定為true。如此   Bitmap Factory . decodeResource ( getResources (), R . id . myimage , options );   將會返回一個null值,也就是說圖片將不會被載入記憶體中。而只是讀入圖片的基本資料,如長寬和檔案的類形。等讀入圖形的基本資料後,先預先做處理,再讀入記憶體中,就不容易出現out of memory了。 我們來看看deveolper上的例子。 public static int calculateInSampleSize ( BitmapFactory . Options

TextView Shadow 文字陰影

圖片
如果幫 TextView 中的文字加陰影。主要有四個參數可在 xml 中調整 android:shadowColor android:shadowRadius android:shadowDx android:shadowDy shadowColor     設定陰影的顏色 shadowRadius   設定陰影的粗度 shadowDx         設定陰影X方向的距離 shadowDy         設定陰影Y方向的距離 XML 範例 <?xml version="1.0" encoding="utf-8"?> <LinearLayout xmlns:android="http://schemas.android.com/apk/res/android"     android:layout_width="fill_parent"     android:layout_height="fill_parent"     android:orientation="vertical" >     <TextView         android:gravity="center"         android:layout_width="fill_parent"         android:layout_height="wrap_content"         android:textSize="20sp"         android:text="@string/hello"         android:textColor="@drawable/red"         android:shadowColor="@drawable/white"          android:shadowRadius="1"                                 android:shadowDx=&quo

android 多國語言

圖片
如何在軟體中內建多國語言的管理 1. 先了解 SDK 目錄底下所支援的地區跟語言   ->SDK 目錄/platforms/android-xx/data/res/      其中android-xx, 是android 的版本,此處是選 android-12 這裡有很多的   values-XXX1-XXX2  意義如下 values是程式專案中的values 資料匣 XXX1      是 language  ->第二步中會用到 XXX2      是 region       ->第二步中會用到 如 values-zh-rCN->簡體中文 zh       是 Language CN      是 Region(r 是自動生成,所以第二步中只需填入 CN) values-zh-rTW->繁體中文 zh       是 Language TW      是 Region (r 是自動生成,所以第二步中只需填入 TW) 2。在eclipse中新增values。選擇專案後,點擊下圖紅虛線框中的按鈕 出現下圖, 在Resource Type選values. 在 File 中填入 string 然後下一步 如下圖 在左邊選Language,最右邊方框(Language)中填入zh 在左邊選Region,最右邊方框(Region)中填入TW 3.完成 回到project中就會看到多出來values-zh-rTW的目錄,目錄底下就是string.xml。 只要修改string.xml中的文字成對應的語言,軟體文字自動會隨手機設定的語言自己改變。

onTouchEvent 單點與多點觸控

以下是一個onTouchEvent的程式寫法, 如果是 public void onTouchEvent(MotionEvent event) , 最後要super.onTouchEvent(event); 如果是 public boolean onTouchEvent(MotionEvent event) , 最後要return true, 有些時候需要用到return false. 有什麼差別呢?我們舉個例。如果有一個linearlayout,我們已經設定onTouchEvent,當手指在這個linearlayout滑動時,linearlayout會做一件事件A。然後我們在這個linearlayout上放上一張圖片,圖片也有設定onTouchEvent滑動時會做事件B。 那麼當我們在圖片上滑動時,是圖片做事件B,還是linearlayout做事件A? 如果只要做事件B,就要return true, 如果事件A跟B都要做,那就要return false。 下面記錄一個範本,供大家使用。 @Override   public void onTouchEvent(MotionEvent event) {                                     int movingMode=0;                    float xDown=0,yDown=0;                    float mX0, mX1, mY0, mY1; ;                    switch(event.getAction() & MotionEvent.ACTION_MASK){                      case MotionEvent.ACTION_DOWN:                           xDown=event.getX();                           yDown=event.getY();                                                     movingMode=1;                                  

InputStream OutputStream

利用InputStream 和 OutputStream實作copy file 和 move file。 InputStream 跟 OutputStream是兩根管子,所有讀進來的東西,都先灌進inputStream裡,所有要寫入的都放進OutputStream裡。接下來的操作就只要從InputStream 和 OutputStream下手即可。如此一來,對於不同的資料來源就變的方便處理, 如網路連線的資料 URL url=new URL(arg[0]);  URLConnection urlc=url.openConnection(); InputStream ins=urlc.getInputStream(); 如對socket的讀取 Socket s = new Socket("www.idon'tknow.com", 1111); InputStream ins = s.getInputStream(); 如處理檔案 InputStream inStream = new FileInputStream(afile); 接下來我們看看move file 跟 copy file的實作。 move file的實作 public static void move(String inputfile, String outputfile) //inputfile 和 outputfile 要絕對路徑     {     try{        File afile =new File(inputfile);        File bfile =new File(outputfile);            InputStream inStream = new FileInputStream(afile);        OutputStream outStream = new FileOutputStream(bfile); //InputStream跟OutputStream都是以byte為單位在處理資料        byte[] buffer = new byte[(int) afile.length()];        int

NumberPicker

圖片
NumberPicker 的使用法 <LinearLayout xmlns:android="http://schemas.android.com/apk/res/android"     android:layout_width="fill_parent"     android:layout_height="fill_parent"     android:orientation="vertical" >     <TextView         android:id="@+id/tv"         android:layout_width="fill_parent"         android:layout_height="wrap_content"         android:text="@string/hello" />               <NumberPicker android:id="@+id/np"            android:layout_width="wrap_content"            android:layout_height="wrap_content"          android:layout_gravity="center"        /> </LinearLayout> 主程式 public class NumberPickerExampleActivity extends Activity {     /** Called when the activity is first created. */     public NumberPicker np;     public int currentNumber;     public TextView tv;     @Override     public void onCreate(Bundle savedInstanceS

Image GridView

圖片
想要做一個格狀排放圖片的方法,先建立一個GridVew的layout( main.xml ) 如下 <?xml version="1.0" encoding="utf-8"?> <LinearLayout xmlns:android="http://schemas.android.com/apk/res/android"     android:layout_width="match_parent"     android:layout_height="match_parent"     android:orientation="vertical" >     <GridView         android:id="@+id/gridview"         android:layout_width="fill_parent"         android:layout_height="fill_parent"         android:numColumns="3"         android:stretchMode="columnWidth"         android:layout_weight="1"/>     </LinearLayout> 再建立一個單獨一格的layout( one_gridview.xml ), 此layout是指定每一格GridView裡有什麼東西,以下的xml是建立一張圖和一個文字說明的layout. <?xml version="1.0" encoding="utf-8"?> <LinearLayout xmlns:android="http://schemas.android.com/apk/res/android"     android:layout_width="match_pare

Random

想要得到隨機函數   先建立隨機物件 Random myRand=new Random();     隨機Long   Long a=myRand.nextLont(); // 得到的值為0~1之間,不包含1   隨機double double a=myRand.nextDouble(); // 得到的值為0~1之間,不包含1   隨機float   float a=myRand.nextFloat(); // 得到的值為0~1之間,不包含1     隨機int     int a=myRand.nextInt(); // 得到隨機整數 指定範圍 int   int a=myRand.nextInt(10); //得到0~10,不包含10 想要50~100不包含100 int a=myRand.nextInt(50)+50;  //得到50~99 隨機真假 Boolean a=myRand.nextBoolean(); //隨機的真假值 高斯分佈中取隨機的數 double a=myRand.nextGaussian(); //隨機從以0為中心,標準差為1的高斯分佈中取出數