發表文章

Android AudioTrack AudioRecord

如何使用 AudioTrack,其實跟AudioRecord差不多, 我們做一個比較 新增一個AudioTrack 跟新增一個AudioRecord幾乎一樣 AudioTrack audioTrack = new AudioTrack( AudioManager.STREAM_MUSIC, SAMPLE_RATE, AudioFormat.CHANNEL_OUT_MONO, AudioFormat.ENCODING_PCM_16BIT, bufferSize, AudioTrack.MODE_STREAM); 以下是AudioRecord AudioRecord record = new AudioRecord( MediaRecorder.AudioSource.DEFAULT, SAMPLE_RATE, AudioFormat.CHANNEL_IN_MONO, AudioFormat.ENCODING_PCM_16BIT, bufferSize); AudioTrack多了AudioTrack.MODE_STREAM這個選項。AudioTrack.MODE_STREAM是指串流的資料。AudioTrack.MODE_STATIC是指一次把整個音源檔載入。 兩個類都有bufferSize這個參數。bufferSize 是需要計算的,也可能跟手機的硬體能力有關。所以兩個類都有提供計算的方法。 int bufferSize = AudioRecord.getMinBufferSize( SAMPLE_RATE, AudioFormat.CHANNEL_IN_MONO, AudioFormat.ENCODING_PCM_16BIT); int bufferSize = AudioTrack.getMinBufferSize( SAMPLE_RATE, AudioFormat.CHANNEL_OUT_MONO, AudioFormat.ENCODING_PCM_16BIT); 這樣我們可以建一個Thread來讓AudioTrack播串流音樂 void playMusic() {     new Thread(new Runnable() {     @Override     pub

python 找圖自動點擊

需要 import 這幾個 module import cv2 import numpy as np import pyautogui import time 滑鼠點擊 def click_image(image,pos,  action, timestamp,offset=5):     img = cv2.imread(image)     height, width, channels = img.shape     pyautogui.moveTo(pos[0] + offset, pos[1] + ,offset, timestamp)     pyautogui.click(button=action) 圖片尋找 def imagesearch(image, precision=0.8):     im = pyautogui.screenshot()     img_rgb = np.array(im)     img_gray = cv2.cvtColor(img_rgb, cv2.COLOR_BGR2GRAY)     template = cv2.imread(image, 0)     template.shape[::-1]     res = cv2.matchTemplate(img_gray, template, cv2.TM_CCOEFF_NORMED)     min_val, max_val, min_loc, max_loc = cv2.minMaxLoc(res)     if max_val < precision:         return [-1,-1]     return max_loc #返回圖片座標 使用方式 if __name__ == '__main__':     pp =imagesearch("./1.png") #尋找1.png的圖。(把圖跟程式放同一個目錄下)     click_image("./1.png", pp, "left", 1) #要點右鍵的話,就把"left"改成 "

升級 ubuntu 後 terminal 無法打開

解決方法 試幾個方法,重開機就好,也不知哪一招有效。紀綠如下 先下載一個 knosole 當暫時的 terminal 第一招 把原本的 .bashrc 先備份一下,砍了。重開機再開terminal看看。 第二招 sudo locale-gen --purge   重開機再開terminal看看。   不行的話,再試試   sudo locale-gen sudo localectl set -locale LANG= "en_US.UTF-8"   重開機再開terminal看看。       第三招 sudo apt remove chrome-remote-desktop   重開機再開terminal看看。  

Python 讀 EXCEL

圖片
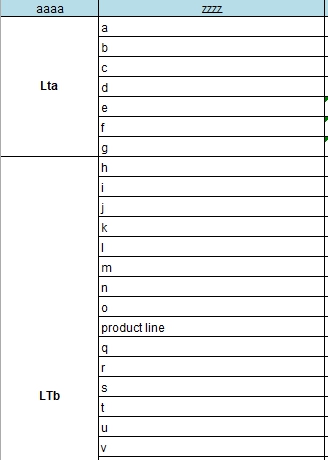
先 from xlrd import open_workbook 開放excel檔 a.xlsx wk = open_workbook('a.xlsx') 查看有哪些sheet for s in wk.sheets():     print "Sheet: $s has cols: $s and rows: $s" % (s.name, s.ncols, s.nrows) 讀第一個sheet 的每一列的資料 for r in range(wk.sheets()[0].nrows):     print wk.sheets()[0].cell_value(r, 3) #第4欄     print wk.sheets()[0].cell_value(r, 5) #第6欄 如果遇到合併格 s = wk.sheets()[0] table = s.merged_cells merCell = {} for r in range(s.nrows):     for t in table:         if r>=t[0] and r< t[1]:             if s.cell_value(r,0) != "":                 merCells[t] = s.cell_value(r,0) 因為s.merged_cells會給出,sheet中所有合併格範圍的list如下 [(1, 8, 0, 1), (48, 56, 0, 1), (39, 45, 0, 1), (8, 32, 0, 1), (45, 48, 0, 1), (85, 93, 0, 1), (93, 109, 0, 1), (56, 64, 0, 1), (83, 85, 0, 1), (32, 38, 0, 1), (77, 83, 0, 1), (64, 73, 0, 1), (73, 77, 0, 1)] 以第一個元素 (1,8,0,1)是指這個合併格的 row 是      1<= row < 8 , 0<=col < 1這個範圍。 所以我們做一個字典,merCell。以m

Python Regular Expression 正則表示式

個人常用的正則表示式 import re 確認進來的字串是否為 數+字母+數+字母+數+字母+數+字母+數+字母+數+字母 a = "1f2g3h4j5k6k"     b="11g4j5k6k5k5j" match會從字串開頭比對,所以 re.match("[0-9][a-z][0-9][a-z][0-9][a-z][0-9][a-z][0-9][a-z][0-9][a-z]", a) -> 返回物件 re.match("[0-9][a-z][0-9][a-z][0-9][a-z][0-9][a-z][0-9][a-z][0-9][a-z]", b) -> None serach字串中有符合即可找到 re.match("[0-9][a-z][0-9][a-z][0-9][a-z][0-9][a-z][0-9][a-z][0-9][a-z]", a) -> 返回物件 re.match("[0-9][a-z][0-9][a-z][0-9][a-z][0-9][a-z][0-9][a-z][0-9][a-z]", b) -> 返回物件 去除空白鍵 a = "a  b       c d     e      f" re.sub("\s+", "", a)  -> "abcdef"   (將空白分隔用空字元取代) 分割字串 a = "kk(L)bb"   , b="a b    cd      e f", c="abc11abc1111abc1111111abc" re.split("\s+", a) =>[kk(L)bb] re.split("\s+", b) ->[a, b, cd, e, f] re.split("\(.+\)", a) -> [kk, bb] re.split("1{3,5}", c)   -> [&#

FileProvide 快速使用

google建議未來要使用手機內部儲存的空間都要先問使用者。 if(ContextCompat.checkSelfPermission(getApplicationContext(), Manifest.permission.WRITE_EXTERNAL_STORAGE) != PackageManager.PERMISSION_GRANTED) {ActivityCompat.requestPermissions(this, new String[{Manifest.permission.WRITE_EXTERNAL_STORAGE},REQUEST_CODE_ASK_WRITE_EXTERNAL_STORAGE_PERMISSIONS);} 這樣就會出現詢問是否讓app使用儲存空間。 接下來用FileProvider,快速使用法 1.在res/xml/建一個 file_paths.xml 的檔案,內容如下。這個檔的作用就是,當我們要得到Uri的路徑時,images這個資料匣名稱(參考下方的XML檔),就會用my_images來替代。以我們的例子,Uri就會變成 content://comp.example.test/my_images/default_image.jpeg <paths xmlns:android="http://schemas.android.com/apk/res/android">     <files-path name="my_images" path="images/"/>     <files-path name="my_docs" path="docs/"/> </paths> 2.AndroidManifest.xml中 <application> …     <provider         android:name="android.support.v4.content.FileProvider"         android:authorities=" comp.e

Image Frame Animation 多圖動畫

要在android的ImageView載入連續圖產生動化效果,我們需要先建一個animation-list的XML,名稱為anim1.xml <animation-list xmlns:android="http://schemas.android.com/apk/res/android" android:id="@+id/anim1" android:oneshot="false" android:visible="true"> <item android:drawable="@drawable/im1" android:duration="500"/> <item android:drawable="@drawable/im2" android:duration="500"/> <item android:drawable="@drawable/im3" android:duration="500"/> <item android:drawable="@drawable/im4" android:duration="500"/> <item android:drawable="@drawable/im5" android:duration="500"/> </animation-list> im1, im2...im5是指放在drawable中的連續圖。 android:oneshot->false是指無限循環, true是指不循環。 android:duration 的 500是 500ms的意思。 在layout   main.xml中 <RelativeLayout xmlns:android="http://schemas.android.com/apk/res/android&quo